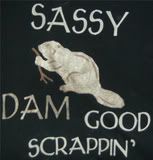
I used a Cricut to create a shirt! You will need:
A shirt
Fabric Paint
a paint brush
Freezer Paper
Iron
Cricut, cartridge and mat

Suggestion: The first time you try this, I suggest you try a simple shape.
If you are using letters on your shirt, you must use the ‘flip’ feature on your Cricut. (You can use regular die cuts for this, but need to be sure that when you cut it the shape will be shiny side down on the finished paper.)
Step 1- Place the freezer paper shiny side up on your Cricut mat.
Step 2- Cut design out
Step 3- Iron the freezer paper negative onto your shirt by placing the shiny side down and using the hottest setting possible for the fabric.
Step 4- Fill in your image with paint. Allow to dry.
Step 5- Paint any “highlights” on your painted image by placing the largest section shiny side down onto the shirt (on top of the paint). (I did not iron on top of the paint, I held the paper and used it like a stencil.) Allow to dry.
Step 6- Carefully peel the freezer paper off the shirt.
If you’d like to see this process in motion, I found this youtube video to be very helpful! I figured if this 13 year old girl can do this, I could, too!


Love it, wear it, need another one.
ReplyDelete