


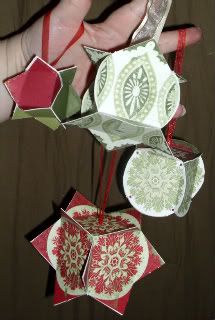
I was lucky enough to come across a sheet of die cut ornament pieces from Little Yellow Bicycle called The Sharon Ann Christmas Magic Collection (Retired, Winter 2008). This happened to be in my stash, and I thought with it being October, if you considered changing up your theme/colors for Christmas, now would be the time to plant that idea. This particular set has enough to make 3 ornaments, and even comes all glittered up!
The instructions are basic and include the measurements make your own without the die cut page!
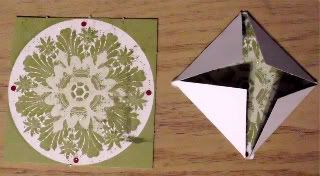
1. Fold each 3" square at the score lines. (four corners in to the middle)like this:
2. Feed a looped length of ribbon (about 10") through the hole in the top piece, and knot on the underside to secure. if desired, add ribbon or tassel through the hole in the bottom piece.
3. Adhere the corners of the pieces together.

4. trim edges with scissors if making a rounded edge ornament. (Or use a corner punch to make it snazzy!)
5. Trim photos to 1 1/2" squares, and attach in the center of the sides if desired.
I made the 3 ornaments per their instructions (minus the photos) and then created one more out of 1 3/4" squares that they provided to use as mats for the photos. This project is easy enough to recreate for any holiday! (Can you imagine a BIG branch with these hangin off of it for little goodie boxes for your halloween party, or as a holiday decoration holding an advent calender-style countdown?) Mine may be ornaments but they are FULL of possibilities! Using a CORNER PUNCH would be A-D-O-R-E-Able!
Make sure you pop on over to CropStop to check out the newest items in the store! They have the tons of new stuff!


What a great find in your stash.
ReplyDelete