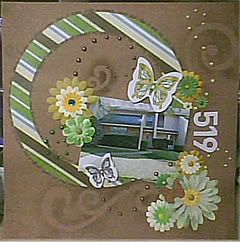
This LO looks like I used screens and Tattered Angel's Glimmer Mist, but I did not. This is very basic, no spray bottle needed!

I used some swirls from a Bo Bunny pack of acrylic (came with a sheet of swirls and a sheet of concentric bractes, not sure where I bought it) for the "mask", but you could cut swirls from a Cricut cartridge, die cut or even free hand draw/cut some out. I decided the basic placement of the photo, die cut circle from DCWV and the swirls. The slid the photo and ring off the background kraft paper and pulled out my SU! Soft Suede ink pad and sponge. I held each swilr in place and dabbed inink over it until I was happy with the amount of shadow, I then added some of the same shadowing around the edges of the 12x12 kraft paper to give it a bit more depth.
Once I got that all done I attached my pp ring and photo & flowers. I used same large multi-swirl and a large single swirl for both the masks and as a guide when placing the Queen & Co. Pearls (their packagin is more for your money & I think they stick better than the Kaiser pearls!)but I almost used dew drops instead!(dew drops and stickles work in place of pearls). I added a few Chatterbox butterflies and, of course, I had to add some American Crafts Thickers!
Imagine with me for a moment how cut a halloween party invite would be with a pumkin or scarecrow sponged on! Even a vacation layout with the car/camper in the background... subtle additions are easy, fill "blank space" and add that last little oomph that it needs to be amazing!


No comments:
Post a Comment