Monday, August 30, 2010

Sparkles!

I am quite happy today, CropStop (my fav!) has stocked up on glitter and embossing powders by Sprinkle & Sparkle! (If you have visited an Hierloom Rubber Stamp & Scrpbooking show you may have seen them there! I used their stuff at a make n take night in Grapevine, TX in Jan. '10 and LOVED it so much I stocked up back then!)

Check out what I did with an acrylic butterfly that I hated the color on...
Photobucket
Photobucket

The butterfly was originally a faded blue and yellow one with a brown body... can we say bland.. and wanted to use it on this multi-pink and green butterfly print card. So I pulled out my Scotch Quick Dry Adhesive (my fave!) and outlined and filled in the blue section with a thin layer of the adhesive. I poured the Burgandy Glitter on, tapped off the excess and let dry. I added Diamond Stickles to the yellow sections and rhinestones to the body. I bent the wings up and glue dotted just the body on.


This one is brand new... never seen before... glitter-rama! I will be doing a tut on HOW soon, but wanted to show you another look using the fab glitter while I was posting about it!!

Photobucket
Photobucket

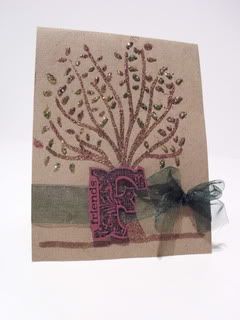
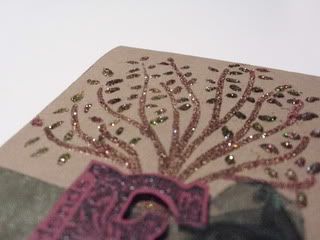
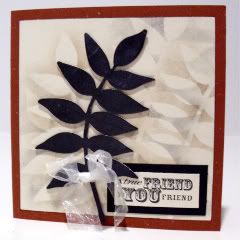
I randomly sprinkled green, gold and burgandy glitter over leaves that were coated in the Scotch Quick Dry Adhesive. The tree itself is copper embossing powder, the sentiment is from Vintage Vogue by SU! in green embossing powder.


Don't forget to stop by the CropStop forum and get registerd for the Fall Frolic! Challenges every day, games, prizes and even a few RAKs from the DT on their own blogs (HINT! HINT!)

Sunday, August 29, 2010

Fall Frolic Crop Starts September 1st!

Cropstop is doing it again! Please join us for our annual "Fall Frolic" online crop and blog hop! The crop will begin on September 1st and go through September 22nd with daily challenges posted by our Creative Team. Participants will have till September 30th to complete and upload their projects in the "Fall Frolic" album in the Cropstop
Gallery. Our Creative Team will be offering great challenges, games, a make n' take and prizes!! Visit their blogs during the crop and you'll have a chance to win additional blog candy!

Please visit and register on the Cropstop.com forum/message board and in our Cropstop gallery so you can participate in our "Fall Frolic" crop . All guidelines and info can be found in the "Fall Frolic" Online Crop thread on the Cropstop forum!!

Tuesday, August 24, 2010

It's a FULL House!

I am not usually the "vintage-y" type, but this line is FABULOUS!

This weekend I finished up a project for my LSS Scrapville in Greenville, TX. They had gotten in the Hallowe'en in Wonderland line from Graphic 45 when I dropped by earlier in the month, and after seeing what my fellow CropStop DT bud Gloria did with it, I had to beg to do the display. Especially, after I saw her fabulous work and noticed that Timmy himself had even dropped her a bit of love, when she posted such fabulous cards (1 & 2).

Photobucket
I used the card print paper, cut it up into playing cards. Then distressed them (Thanks, Scrap Mom, for the use of the distress it all!)and really wrinkled them up. They are pop-dotted (of course!), as are the stickled letters, the little "make your own embellie" hats and cheshire cat.
Photobucket
Photobucket
Photobucket
Alice is cut out of the "ad" style creme pp and colored in with sharpies and a sponge using my SU! ink pads. The edge of the LO, the title (cut using the George Cricut cart.) and the green paper under the cards are all altered using the Adirondak Dabber in Lettuce.

The bling flourishes add that little lift and flash to the Mad Hatter's hats... because, after all he is flashy! Thanks for dropping by and be sure to drop by Gloria's blog to see her fabulous Graphic 45 Design Team creations and leave her some love!

This is the first of the two LO's that will be up over at Scrapville, but you'll have to visit Scrapville or the CropStop forum to see the others in September! While you're there, pick up the G45 paper, Stickles, Dabber or grab them online at CropStop!

Monday, August 16, 2010

Shake Up a Punch

So, for a card class this coming weekend, I wanted to create a shaker card, but was not wanting the typical glitter/sand filler. I wanted something that was a bit bigger and could be in the color I wanted. So I located a baby bottle punch and filled the shaker with that!

Photobucket

It made the perfect Baby Shower card when combined with some umbrella print paper and the SU! sentiment with the umbrella saying "for your shower". Then I realized I dropped off the card to the store without a final picture. imagine a ribbon (green with white polkas) tied around the bottom of the shaker with the sentiment popped off of it. Will try to get a final shot loaded soon.

Photobucket


Here's a quick glance at the cards for the class at Scrapville on Sunday (two of them, this shaker and the glimmer mist card weren't finished when I snapped this, you'll have to come to class to see the final results!)
Photobucket

Wednesday, August 11, 2010

Trash to Treasure

How many of you take the sticker paper off the back of a self-stick chipboard embellishment and toss it in the trash? I know I used to, but not very often anymore, especially when the piece is so classic! This stalk of leaves has to be one of my favorites, and check out the way I used the sticker paper to make my own pp.

Photobucket

When I peeled off the sticker paper, I set the chipboard shape to the side (and upside down) then used a sponge with my black and brown ink pads to make some “shadows” of the branch on crème paper. I carefully edged that crème paper with the black ink, without giving it that ‘inked’ look, and mounted it on the speckled rust cs. I quickly stamped the sentiment (from SP!) with the same black, on crème and matted it on black. Tied a sprig of crème chiffon ribbon on the chipboard and stuck it on!

Head on over to CropStop to check out what else is being created!

Friday, August 6, 2010

Using Part of an Embossing Folder

This week I decided to use one of Tim's EFs and my scrap box.
Photobucket
Photobucket
The little tag is made using the Tim Holtz Texture Fade folder and a square of white chipboard. I embossed the "gauge" section and then ran a bit of acrylic paint over the edges. I whipped up a card from my scraps and tied the little embossed tag on and wah-la... card done!

So drag out your folders and that bin of leftovers you've been hoarding, and create away!